TRANSPORT HELIJET A12
A fairly recent model, the Transport Helijet is one of my favourite creations, based, very loosely, on a number of different helijets seen in Gerry Anderson shows. This article originally appeared in Issue #1 of "21st Century Modeller" published by those fine gentlemen at "Sci-Fi and Fantasy Modeller" in the U.K.


A fairly recent model, the Transport Helijet is one of my favourite creations, based, very loosely, on a number of different helijets seen in Gerry Anderson shows. This article originally appeared in Issue #1 of "21st Century Modeller" published by those fine gentlemen at "Sci-Fi and Fantasy Modeller" in the U.K.

H
|
aving been an avid fan of the futuristic designs of Mike Trim and the exhilarating FX work of Derek Meddings for longer than I care to remember, my recent forays into Sci-Fi model building have tended to concentrate in the area of the Supermarionation series. While there was a time when my model making was heavily influenced by the Star Trek shows, the works of Irwin Allen and “2001: A Space Odyssey”, along with many others too numerous to mention, I find that as I get older, I’ve had a tendency to regress into my childhood memories of watching the Gerry Anderson shows and feeling the utter thrill of seeing another new vehicle or aircraft roaring across the screen. Having collected a decent amount of reference material in the form of books, articles, photographs and the like over many years, I still get that amazing rush when I watch an episode again on DVD. Coupled with a much clearer understanding and appreciation of how these model effects were created has given me even more enjoyment than they did in the 1960s, when I would gaze at the small black and white TV screen and wish I was a member of WASP, International Rescue, Spectrum, WIN or SHADO. It appears that these shows have not diminished in popularity over the last 40 or so years, but that they have actually become even more popular with time. Very few TV shows from the 1960s are remembered as fondly as those of Gerry Anderson and to the models of Mike Trim and Derek Meddings. Being a primary school teacher for more than 30 years, I can state categorically that most children I’ve taught are still watching “Thunderbirds” on TV!
A
|
fter all the years I’ve spent building models and trying to perfect usable techniques, I now feel comfortable in completing something that I’m quite happy with. It has taken quite a while! The influence is Mike Trim and Derek Meddings undoubtably, but I like to “do my own thing”, so the final designs are mine alone. The subject of this article is a one-of-a-kind. It doesn’t exist anywhere else, either as a kit or in a TV show, which makes it unique in a way that is pleasing to me. Quite a number of helijets appear in episodes of “Thunderbirds”, “Captain Scarlet” and “Joe 90” and many modellers have been faithfully tracking down every kit part on the originals to produce stunning, mouth-watering studio-scale replicas. My own design was inspired by the helijets appearing in “Joe 90” episodes. These were either original designs carved from wood, or from large scale converted children’s toys, while others were re-dressed and re-modelled from earlier designs in previous shows. If my Transport Helijet reminds you of something you’ve seen on TV, or if you feel that it could have come from the talented pencil of Mike Trim, or the genius of Derek Meddings, then I’ve succeeded and the model will fit nicely into the Gerry Anderson Universe, something I’m very proud of. After all, I’m just a little kid watching a small black and white television in the early 1960s!


W
|
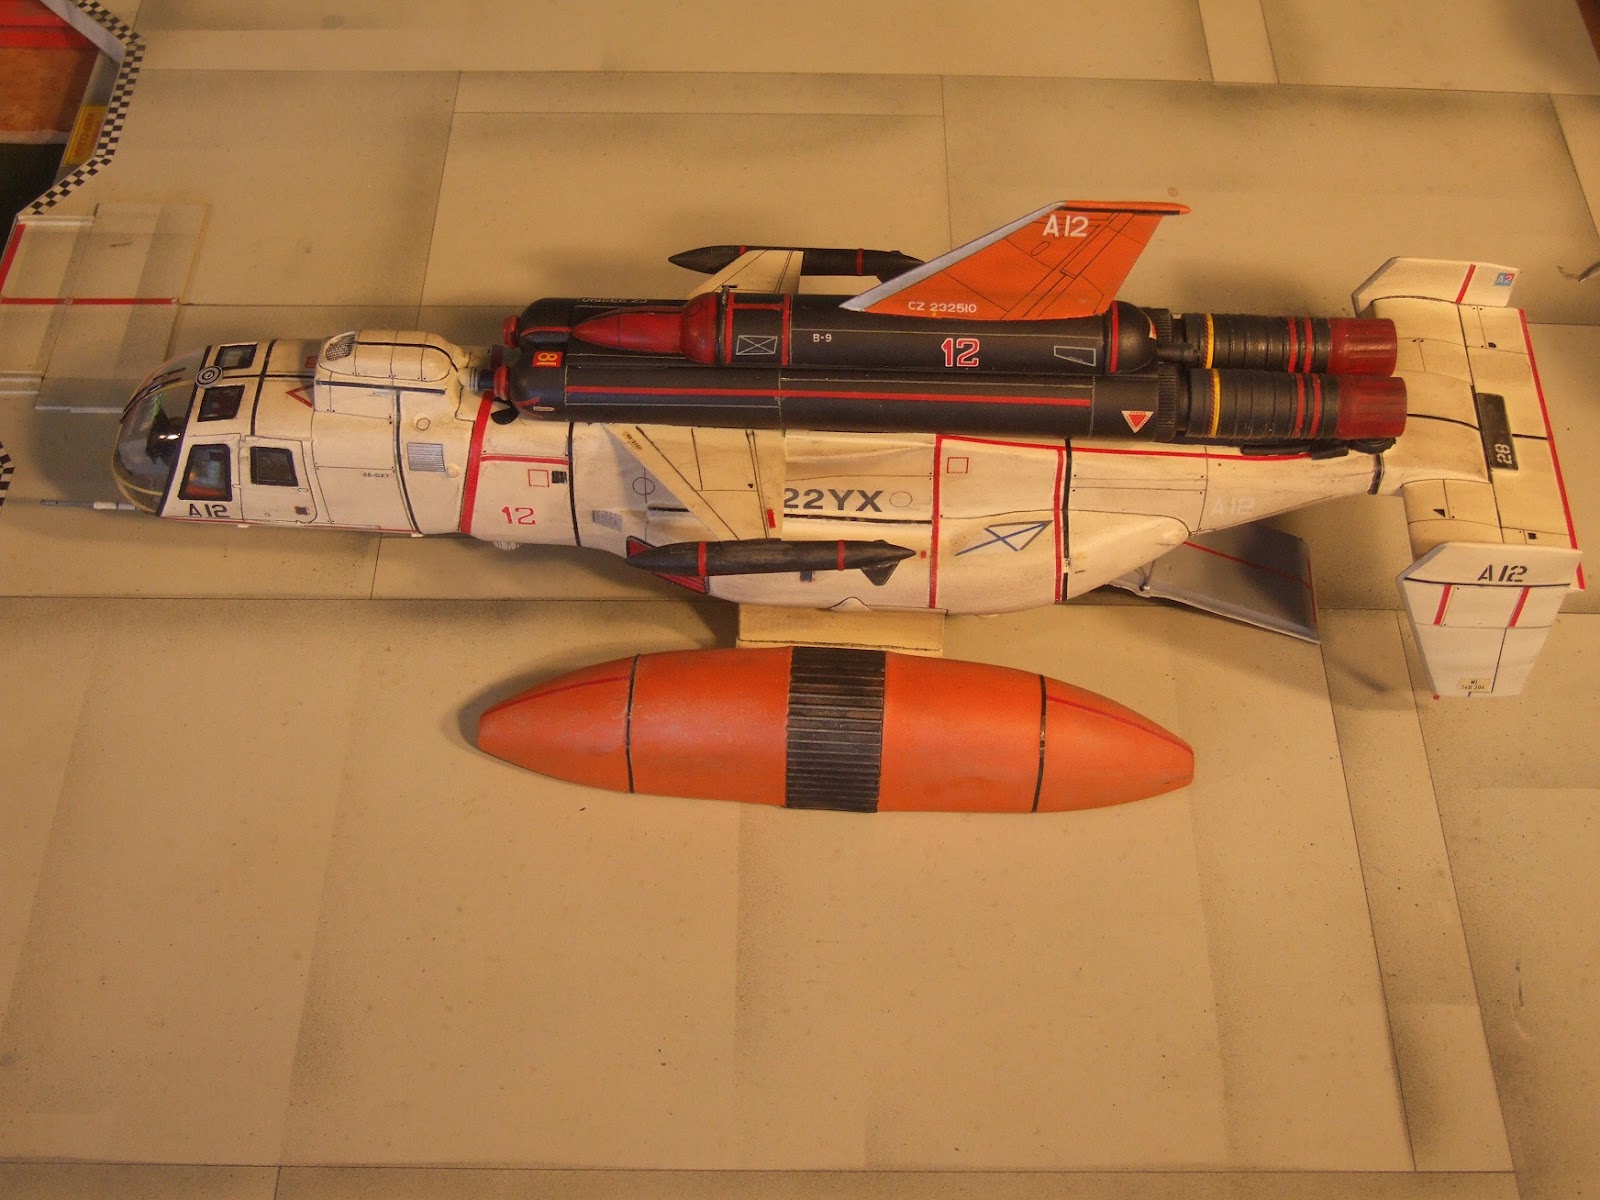
ith this creation, I didn’t begin with a sketch or a plan of any sort, rather the model built itself and I just helped it along a little! The basic fuselage comes from two sources – the 1:48 scale V-22 Osprey aircraft by Italeri and the BO 105 helicopter from the ADAC Helicopter-Set in 1:32 scale by Revell. I had already previously converted another of the three helicopters into a helijet quite a few years ago and I was keen to “butcher” another one of the trio. For probably six or seven years since I purchased it, that three-helicopter box sat on a shelf collecting dust, but not any longer. Two down, only one more to go! Being in 1:32 scale was an advantage for me as I wanted to build a helijet that had some size to it, something that I could properly play with! Unfortunately the pilots in these helicopters look like they’ve been stunned by a Romulan disruptor and the moulding is rather crude, but at least they’re a decent size. My eyesight is way past painting and detailing pilots and cockpits for anything in 1:72 scale! I’d always liked the Osprey fuselage shape and my original intention was to convert it to a futuristic, but more conventional looking jet aircraft, minus those huge propellers of course. The initial step was quite painful, as I took to both models with a hacksaw, removing the tail from the helicopter and the nose from the Osprey. Most of the exterior details were sanded away from both models, as I would be adding my own at a later stage. After trial-fitting the front of the helicopter with the rear end of the Osprey and patiently trimming and re-trimming sections for a better fit, I was finally ready to mate them permanently together. This was achieved with liberal doses of contact cement, along with layers of car putty to ensure a strong bond between the two disparate halves. Getting the two sections to join successfully and, more importantly, along the correct alignment, was no mean feat. I wasn’t 100% happy with the result, but I can live with that as the slight difference is barely noticeable. Just to make the design a little more interesting, I added the entire Osprey tail assembly upside down, something I’m well noted for doing, according to members of my local model club.


D
|
etailing the helicopter cockpit was a simple matter of assembling the basic area and adding some extra bits to make it more interesting. As most of the cockpit would be visible through the large canopy “glass’, I spent some time in carefully painting the pieces, including the pilot who began looking less comatose and more likelike after a few coats of paint. The interior of the Osprey features a very basic corridor which I assembled intact, along with the door/ramp at the rear. I wanted to be able to photograph the model with the ramp either raised or lowered, so I left it in one piece and added thin brass tube to the hydraulic rams to allow for the extra length needed to have the ramp fully extended and touching the ground. Just to give myself some additional work to do, I had decided to install tubing along the length of the fuselage to allow me to “fly” the helijet along thin wires above a miniature set or in front of a sky background. I had reasoned that if that technique was good enough for Derek Meddings to achieve certain model aircraft shots, then it was good enough for me too. The technique was originally pioneered by FX artists Howard and Theodore Lydecker during the 1940s. Narrow aluminium tubing fitted the bill, taking far longer than I had anticipated to position correctly and putty into place. I haven’t as yet tried “flying” the helijet using the tubing, but I have tried it on another model and it seems to work quite well. From now on, all aircraft I create will have this internal tube system to help them slide down fishing line and perhaps I’ll also install small hooks at a number of places on the body from which I can suspend the model during still photographs and video sessions. During my first video attempt with some models, my short film “Avalanche!”, chronicled in “SF & F Modeller” Issue 21, I resorted to supergluing some brass tubing to the upper wing surfaces of an aircraft model in order for it to slide down some taut fishing line for certain flyover shots. While using the brass tubing was quite successful, the superglue effectively ruined the extensive paint job I had spent weeks doing. So, from now on, all support tubes and suspension hooks will be built into the model, rather than being left as an afterthought.


O
|
n to the landing pontoons/skids/”feet”, whatever you’d like to call them. I toyed with the idea of actually carving one from wood and then recasting a pair of them. Being the relatively lazy modeller that I am, this idea was discarded as being too much work. Besides, I had run out of casting resin anyway. Well, that’s my story and I’m sticking to it! I searched around for suitable parts to convert to the pontoons in my collection of bits and pieces. Now, when people say that they have a lot of spare parts lying around, they obviously haven’t seen my collection of thousands of plastic containers, toothbrush tops, shampoo bottles, kids’ toys and miscellaneous paraphernalia. I literally have more than eight, 110 Litre storage containers filled with all manner of stuff that I’ve collected over the past thirty years or so. I throw absolutely nothing away! Luckily I am the proud owner of a rather large shed! Scrounging through hundreds of plastic containers, I spied some clear bird feeders, the half-round sort that hang in the family budgie’s cage. Placed end-to-end, they produced a very pleasing look for the pontoons. Strips of sheet styrene helped to join them together and the recess in the middle was detailed with some ridged plastic that had been lying around for years. How to join them to the fuselage? The first consideration was the weight of the model and whether or not any support struts would be strong enough. The propellers from the Osprey kit provided some ideas, however I went with something that could be attached to the outside of the fuselage, part of a tank body, the lower half to be more precise. An old, 1:35 scale one turned up in a box and was promptly trimmed down and hacksawed in half. Now I had a pair of right angles that I could glue to the underside of the helijet’s fuselage and then attach the pontoons to them. Problem solved, and they looked okay as well.


The next construction phase was that of the horizontal flight jet engines that sit atop the fuselage. I wanted an elongated unit that would lie along the dorsal area of the helijet and be formed from a cluster of cylinders, This came together quite nicely and consisted of a pair of clear plastic cigar containers (true “Thunderbirds” and Sunprobe rocket fans will find that slightly ironic) which were glued together and a long, narrow strip of sheet styrene was added to the upper surfaces. On to that I glued one half of a plastic fuel tank that originally came from an obscure Japanese SF model kit. A vertical stabiliser was affixed to the top of that and various other pieces of drop tank halves detailed the remainder of the unit. I chose some suitable looking aircraft engine exhausts to join to a pair of 1:35 scale tank pieces and these were firmly cemented to the rear of the engine unit. Using my Dremel tool, I gouged out a section from the top of the fuselage, into which the assembled engine unit could be placed and firmly cemented.
I
|
wanted the underside of the helijet to be fairly simply detailed and, along with the use of four vertical jet thrusters and a smattering of miscellaneous kit parts positioned in pairs along the fuselage, I located a 1:700 scale ship hull that fitted perfectly down the centre. Looking a little too narrow in shape overall, I decided to add some drop tanks to widen the helijet out a bit. These consisted of a pair of wings from some unknown aircraft kit and, surprise, surprise... a couple of drop tanks from another unknown model. Well, sometimes I don’t butcher a kit part to make it into something totally different – I just used the tanks as they were and they turned out just fine. Because of the fuselage bulge in the Osprey, I wanted to add some intakes to the front. Well, you can’t have a Derek Meddings models without intakes, can you? Unfortunately, I had already glued the halves together and had detailed some of the model at this stage, so I was unable to recess the intakes which I really wanted to do. I resorted to adding them to the outside of the fuselage bulge. I used similar ribbed plastic sheet that I had used to join the pontoon halves and they looked reasonably okay. Various other kit parts were used to detail the helijet, mostly aligned in pairs on either side, or just straight down the middle if I only had one of them.


C
|
areful masking of the “glass” areas of the cockpit windows was achieved with Tamiya tape and the entire model was sprayed with a grey, acrylic car primer. This really brought all the disparate colours and details together into a cohesive whole which actually began to look like an interesting model. After drying thoroughly, the model was sprayed with another car colour, Torquay Sand, which ended up look a little too pink for my liking. I wasn’t painting Fab 1, after all! I stuck with it anyway and then proceeded to mask off the entire model so I could spray the upper engine area in Strato Grey, a very dark, almost black colour which I was concerned would be too dark against the rest of the model. The pontoons and upper vertical stabiliser were sprayed with Venus Orange and, after which, I was left with a very brightly coloured, toy-like model that just begged to be played with, er... I mean dirtied down and weathered considerably in order for it to appear a little more realistic. Other details were hand painted using Tamiya Matt Red and Gun Metal.
P
|
anel lines were drawn on in lead pencil, using a length of thin acrylic as a straightedge. This allowed me to draw lines over the many curved surfaces relatively easily. Next came the application of many, many narrow pieces of car pinstriping tape, very carefully laid out on the model, with daubs of superglue in the middle and at each end to hold them securely in place. The tape was cut down from the initial 3mm width to about 1mm. This “taping” process took many hours to accomplish. Wanting to add detail lines to the very dark upper engine unit, I managed to scribe them using the sharp point of a pair of children’s school compasses. The next step was the addition of numerous decals from the spares box. Did I tell you that I have a box containing thousands of these too? To detail the engine intakes on the front of the fuselage, I resorted to adding a band of thin, black elastic around both and I was pleased with the final result. The cockpit masking was removed and unpainted Tamiya masking tape added to the “glass” in required areas. Other Tamiya masking tape was sprayed Matt Black, cut into thin strips and carefully placed around each window frame. I chose some generic decals that contained the number “12”, added an “A” in front and the helijet became “A12’. My usual method for weathering a model takes the form of using an airbrush and a business card to produce a “lined/panel’ effect over the entire surface, however I wanted to try something different with this one. I’d had some success with a previous model when I basically “drybrushed” over the model to give it a weathered look. A little of that was used on the helijet model, but the majority of the “filthiness” on it was produced by me rubbing cigarette ash on with the tip of my finger. Yes, I know, disgusting habit! The end result was no longer a pristine toy, but a realistic helijet just waiting to be put in front of the camera. I purposely overdid the weathering as this will only “read” very slightly on camera due to the intense lighting used to illuminate it in a miniature setting. Most of the “Thunderbirds” models were absolutely filthy, but because of the intense lighting necessary for slow motion cinematography, they only looked half as filthy!


A
|
fter setting up a table tennis table in my shed, I proceeded to add some generic buildings to the scene, along with a wooden cutout for the far distant mountain ranges. The simulated “concrete” base of the scene was a previously built one and served this purpose very well. In all, the miniature set was about two metres wide and about the same in depth, with a painted sky backing propped up at the rear. This was a very quick setup and I know I can improve on the photography, however the shots came out looking okay. Lighting was provided by two pairs of tungsten/halogen lamps. I suspended the helijet model with thin fishing line from an overhead pole G-clamped to a ladder, set the camera up down low and shot about twenty photos from differing angles. For some, I placed the model on the set and opened the rear ramp, positioning it with the hydraulic rams in place. After completing the photos, they were downloaded into the computer and I got to work removing the support strings using Microsoft Digital Image Pro Version 7, an old program that contains a little tool I like called a clone brush. (Now if only someone could tell me what program I use to remove wire supports in video footage, I’d be over the moon!)
A
|
s I stated previously, this model was inspired by those helijets seen in various programs such as, “Joe 90” and the fact is it literally came together all by itself. There was no plan, I just went the way the kit parts told me to. That’s my story and I’m sticking to it!
Good one, Captain.
ReplyDelete